
20 Canva Tips to Help You Create Stunning Designs


Canva Tips to Try on Your Next Design
Are you a blogger or entrepreneur looking for Canva tips to step up your design game?
No worries. I got you.
As a business owner, you know the importance of having visually appealing content that aligns with your business, from Instagram posts and Pinterest pins to e-books and opt-in forms.
So what do we do?
We turn to Canva for visual guidance, but let’s be honest, Canva can get pretty overwhelming. However, with the proper knowledge and skills, you can be a Canva design ninja in no time.
Let’s explore some of the best Canva tips and tricks.
- 1. Review Canva’s Terms of Use
- 2. Save Time with Pre-made Templates
- 3. Use Rulers and Guides, Margins, and Print Bleed to Align Your Designs
- 4. Use the Lock Tool to Lock Pages and Elements
- 5. Use the Search Bar to Find and Filter Elements
- 6. Use the Color Palette Generator to Create Your Own Color Schemes
- 7. Evenly Align Elements Using the Position Tool
- 8. Copy Styles with the Copy Style and Format Tool
- 9. Create QR Codes with the QR Code Generator
- 10. Import Files into Canva
- 11. Edit PDFs in Canva
- 12. Save Time with the Find and Replace Text Feature
- 13. Use Hyperlinks to Link Within Your Design or an External Source
- 14. Publish Websites Through Canva
- 15. Use Shortcuts to Speed up Your Design Process
- 16. Use Magic Write to Generate Written Content
- 17. Organize Your Canva Account to Stay on Top of Your Projects
- 18. Use the Magic Resize Tool to Resize Your Designs
- 19. Set Up Your Brand Kit to Keep Your Designs Consistent
- 20. Remove Image and Video Backgrounds
- Related Canva Articles
THIS POST CONTAINS AFFILIATE LINKS, WHICH MEANS I MAY RECEIVE A COMMISSION FOR PURCHASES MADE THROUGH MY LINKS AT NO EXTRA COST TO YOU.
What is Canva?
Canva is a free graphic design tool that allows you to create eye-catching graphics for your business, from marketing materials and lead magnets to business cards and logos.
Also, there is a paid pro version of Canva that offers more features and customization options.
Canva’s all-in-one design system makes it easy to create beautiful designs and is an excellent option for beginners.
Furthermore, you can upload your own files, choose from millions of stock photos, use pre-made templates, edit videos and images, and access millions of elements, fonts, and color palettes.
Who says designing graphics has to be a challenging process?
Work smarter, not harder. Amiright?
Now, let’s jump into those Canva tips.

Tips for Canva’s Free Version
1. Review Canva’s Terms of Use
Who reads the fine print these days, anyway?
I know you’re here for designing tips, but I’d be remiss not to mention the importance of reviewing Canva’s terms of use.
Besides, I wanted the boring stuff out of the way first.
Canva has many free tools and features, but it also has license agreements that determine how you use its platform.
For instance, Canva doesn’t allow you to use stand-alone content for sale; instead, they ask that you make your design unique. For example, using a graphic on a printable without making changes is still considered stand-alone content. You need to put your own spin on the design—add other graphics, use fonts, or add a background.
Check out their complete Terms of Use here.
Furthermore, I know terms of use and content license agreements can be confusing, so I attached a video that may help you understand more.
Remember, when you use Canva, you’ve agreed to their Terms of Use. The last thing you want is to use their services only to realize you’ve violated their agreement. Take a few moments to review the Terms for the sake of your business.
2. Save Time with Pre-made Templates
One of my favorite features in Canva is its ready-to-use templates. Instead of starting your designs from scratch, you can choose from the hundreds of templates in their library.
With pre-made templates, you can quickly create infographics for social media, charts for your blog posts, and presentations for your audience.
You can explore the list of Canva templates from your homepage or search for a specific template in the search box.
In most cases, Canva will have a template to bring your design idea to fruition. However, when I can’t find an exact template, I pick one that’s close enough and tweak it to my liking.
3. Use Rulers and Guides, Margins, and Print Bleed to Align Your Designs
Have you ever struggled to line up your graphics perfectly? How about printing a design and finding an essential element outside the margins?
I’ve been there.
Fortunately, Canva gives us a few tools to help us make sure our designs are flawless.
Rulers and Guides
Rulers and Guides make it easy to create symmetrical designs. The Rulers and Guides will appear on the top and left of your design. And they’re only visible within your design, and will not appear in the final project.
Follow these steps to turn on Rulers and Guides:
- Click File
- Then, select View Settings
- Click show Rulers and Guides
- Then, click on the ruler and drag it onto the canvas to align your design
Margins
Margins help you create designs within specified parameters. A grey border will serve as a guide to help you keep important objects inside the margin.
Here’s how to use Margins:
- Click File
- The, click View Settings
- Select Margins
Print Bleed
Print bleed helps you avoid unintended white edges when printing. A grey border will appear around the outside of your project. Stretch your background, elements, and other objects beyond the border to prevent white edges from appearing when printing.
Follow these steps to turn on print bleed:
- Click File
- Then, click View Settings
- Select show Print Bleed
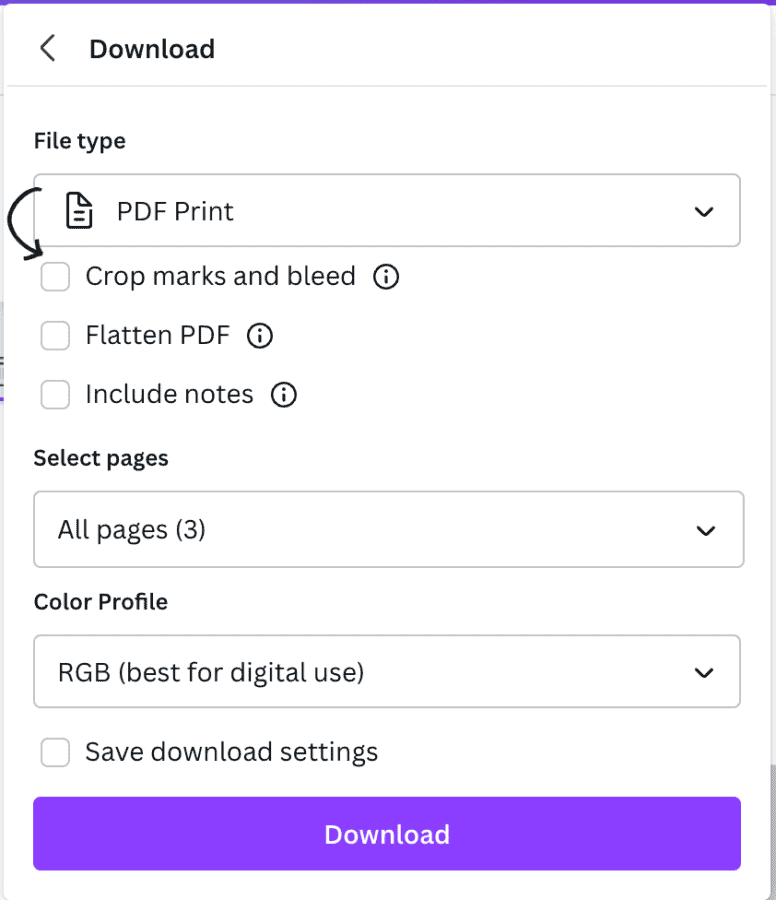
Bonus Tip: Before you download your project, select the Crop Marks and Bleed option if you plan to trim your design after printing
4. Use the Lock Tool to Lock Pages and Elements
Oh, the dreaded task of working with elements close to each other.
Take it from me, save your sanity and use the Locking tool.
The locking tool prevents you from accidentally selecting or moving objects around in your design.
Hold an element in place and make minimal adjustments with the partial lock option; otherwise, use the full lock to hold everything in place. For instance, you can edit text and change background images with the partial lock option; however, when you use the complete lock, you can’t move or adjust objects.
Here’s how to use the Lock feature:
- Click the three vertical dots in the Top panel
- Then, tap the Lock icon once to lock an element partially (you should see the icon switch to a lock with a pencil)
- Click the Lock icon twice to lock objects or the page completely (you should see a close lock icon)
- Once more, click the Lock icon to get it unlocked.
5. Use the Search Bar to Find and Filter Elements
If you’re familiar with Canva, you know they offer millions of elements and images for us to use in our designs.
Imagine scrolling through all of those elements.
No way!
Fortunately, Canva has a handy dandy and robust search feature to help you find what you need with only a few clicks.
In fact, Canva’s search bar allows you to search for elements, templates, texts, and uploads. Type in the keyword or phrase you’re looking for, press enter, and Canva will display graphics, photos, and videos related to your search.
Furthermore, use the filter icon to narrow your search and choose a specific color, orientation, and free versus pro elements.
In addition, you can find more graphics from the same designer. Hover over the image, click the three vertical dots, and select the See More Like This option.
6. Use the Color Palette Generator to Create Your Own Color Schemes
In the past, I used third-party tools to pull colors from an image. Then, I’d write down the color codes and manually add them to my designs or website.
If you’ve ever done the same, you know this process gets old fast.
But did you know Canva has a Color Palette Generator to help you create color palettes?
When you add an image to your Canva design, Canva will automatically pick out the colors from the image and create a color palette for you.
You can also use the Eyedropper tool to select specific or more intricate colors from your image.

Follow these steps to use the Color Palette Generator:
- Add a photo to your design
- Then, click on the Colorful Tile icon in the Top panel to see your color palette
7. Evenly Align Elements Using the Position Tool
Have you ever struggled to get your objects aligned perfectly?
There’s good news. Canva has a tool to help you space elements evenly. The Position tool is a feature that allows you to move, align and tidy up your objects.
Gone are the days when we’d go cross-eyed trying to line up dozens of small squares.
Here’s what you can do:
- Move objects forward, backward, to the front, and the back
- Align elements to the top, middle, bottom, left, center, and right of the page
- Evenly space elements vertically or horizontally
- Automatically line up graphics with the Tidy Up option
Follow these steps to use the Position tool:
- Select the object (s) you want to align
- Click the three vertical dots in the Top panel
- Then, choose your position
Bonus Canva Tips:
- Hold the Shift key and click to select multiple elements
- Hold Ctrl/Cmd key and click to scroll through the elements
8. Copy Styles with the Copy Style and Format Tool
Another helpful Canva tip is to use the Copy Style and Format tool to apply the same formatting to another element.
Copy font style, size, and color. You can also copy the element filter and transparency. However, the copy style features only work on similar items. For instance, you can’t copy the style from a graphic and apply it to a text element.
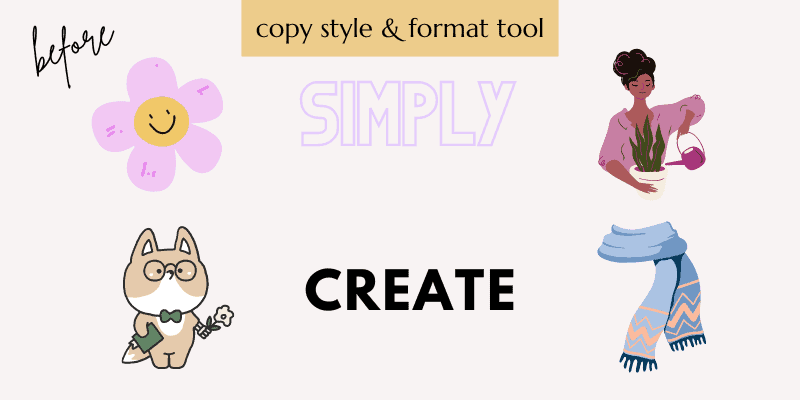
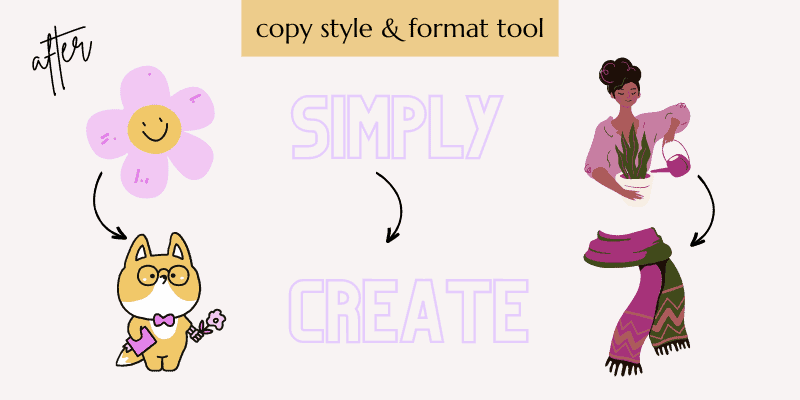
Here are the steps to use the Copy Style and Format tool:
- Choose the object you want to replicate
- Click the three vertical dots in the Top panel
- Then, select the Paint Roller (Copy Style)
- Finally, click the element you want to apply the settings to
Bonus Tip: If no color tile appears when you select your element, the Copy Style and Format tool will not work
9. Create QR Codes with the QR Code Generator
Canva’s QR Code Generator allows you to create unique QR codes for your projects.
QR codes are a great way to connect your customers to you and your business. Now, you can ditch the long URL links and simply have your customer scan a barcode.
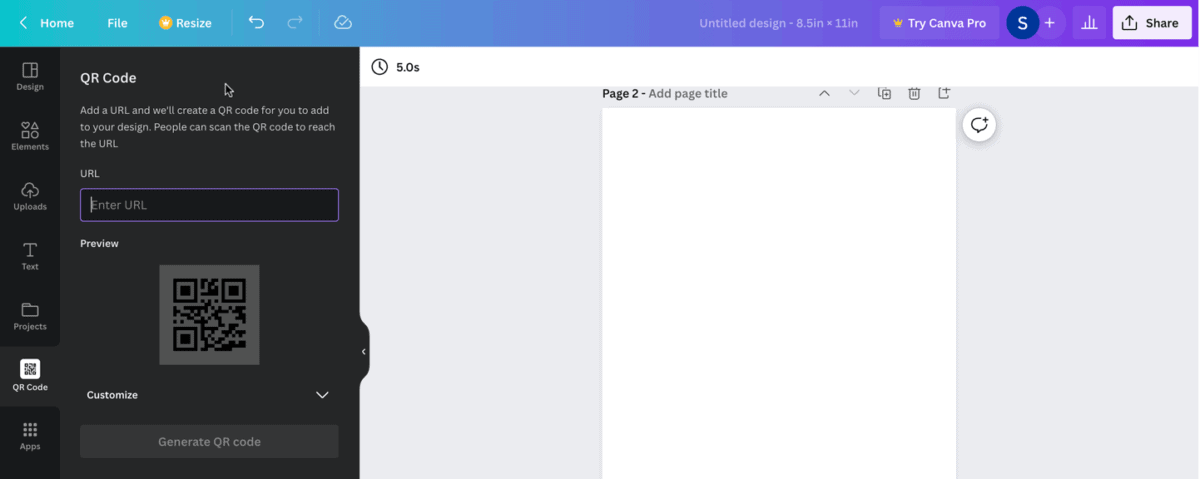
For example, you can use the QR code to link to an external source, like a landing page, social media page, website, or business card.
In fact, I’ve seen many bloggers use QR codes in their webinars and presentation videos to send viewers to a lead magnet or sales page.
Here’s how to use the QR Code Generator:
- Click Apps in the Editor Side panel and select QR Code
- Then, enter your URL
- Customize your margin, background, and foreground (optional)
- Then, click Generate QR Code
10. Import Files into Canva
One excellent Canva feature is the ability to upload your own files. You can upload your brand fonts, logos, and images you create in other programs.
You can import the following files:
- JPG, PNG, AI, HEIC/HEIF Image format
- Audio and Video
- PDFs
- Fonts
- Powerpoints
- CSV (google sheets and excel)
One place to upload files is your Canva homepage.
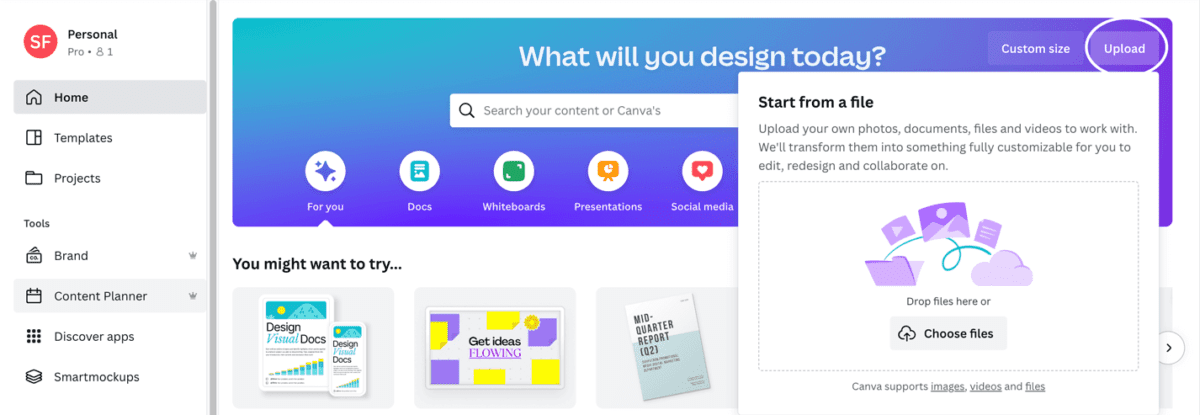
- Click the Upload icon on the top right
- Then, click Choose Files and add your items (you can also drag-and-drop in your files)
Bonus Canva Tip: To keep your Canva account organized, select the designated folder, then upload your files into the specified folder.
The other way to import files is during the design process.
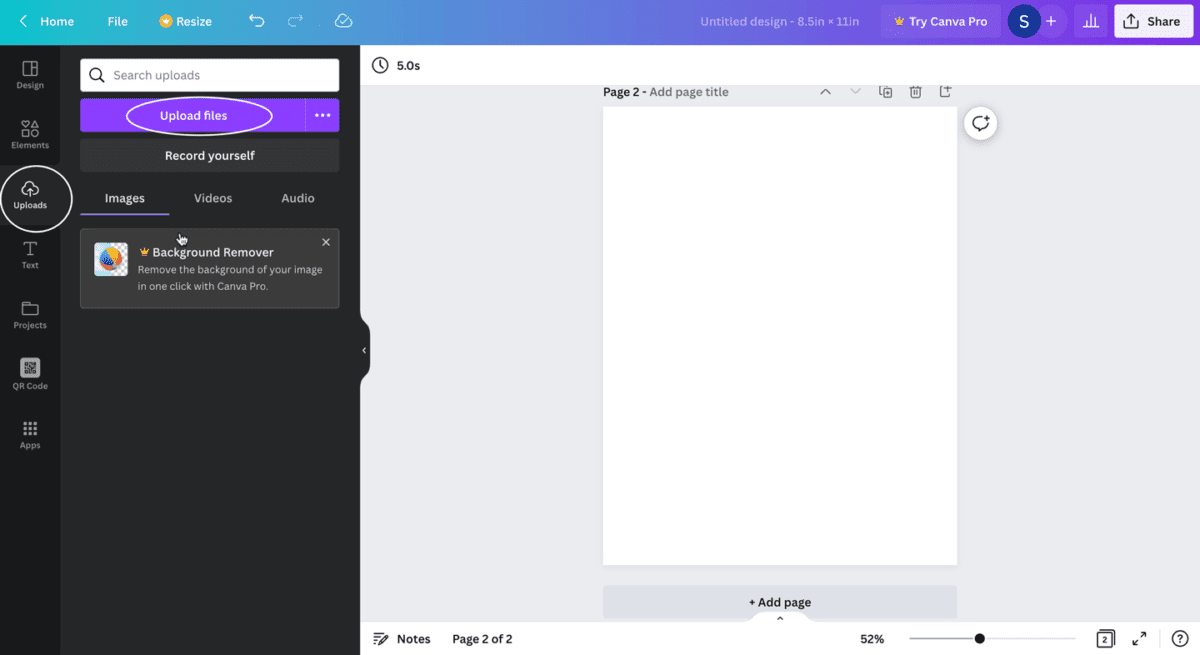
- Select Uploads in the Editor Side panel
- Then, click the Upload Files button to import your files (you can also use the drag-and-drop function)
11. Edit PDFs in Canva
Editing your PDF documents can be a pain, but Canva makes it super simple with their PDF Editor.
The PDF Editor allows you to upload and edit your document. Instead of starting your project from scratch, import your PDF files, and Canva will break them down. Then, you can edit each item separately.
You can adjust images, rewrite texts, delete objects, add elements, and rearrange pages. I love to use this feature when I need to pull pages from multiple documents and combine them into one or update an e-book or freebie.
Follow these tips to use the PDF Editor:
- Upload your PDF file
- Then, open your document in the Canva editor
- Your PDF file will appear in your Canva design
12. Save Time with the Find and Replace Text Feature
Similarly to the Find and Replace feature in a Word or Google doc, the Find and Replace Text feature in Canva helps you make bulk edits across your entire design.
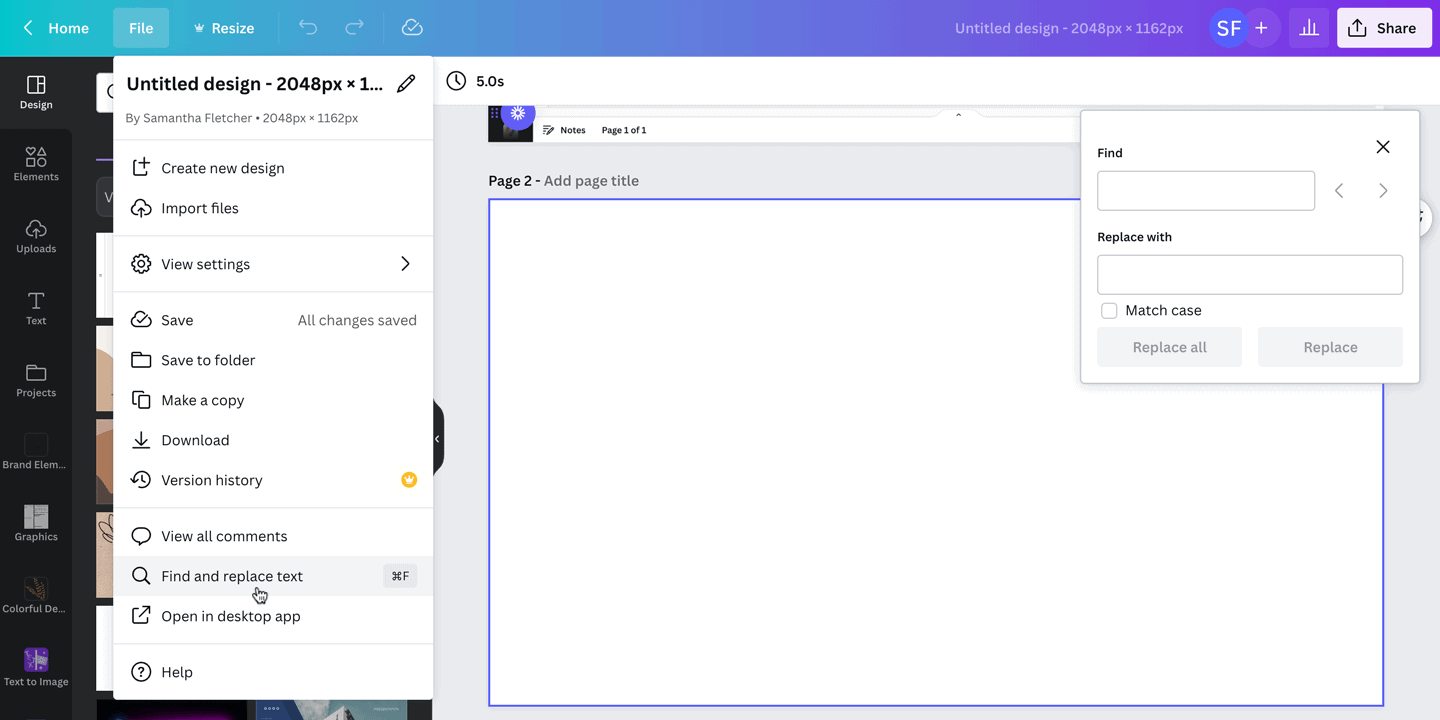
For instance, this tool works great for updating your document and checking for spelling errors, all in one full sweep.
For example, if you need to replace one word with another, this feature will help you find all instances of the word, and Voila, you’ll see your document automatically update.
Here’s how to access and use the Find and Replace Text tool:
- Click File and select Find and Replace Text
- Then, pop your word or phrase into the Find section
- Type your new word or phrase into the Replace section
- Then, select Replace or Replace All
Bonus Tip: Use the Match case feature to keep text formatting consistent
13. Use Hyperlinks to Link Within Your Design or an External Source
I’ve often wondered how digital planners worked. It surprised me to find out that it’s a simple hyperlink.
With that being said, hyperlinks allow you to interlink pages within your document or link to external sources.
And Canva makes it easy for you to add hyperlinks to any content. For example, you can link anything from email addresses and social media sites to review pages and affiliate sites.
Here are places to add hyperlinks:
- E-books
- Planners
- Videos (only available in the presenter window)
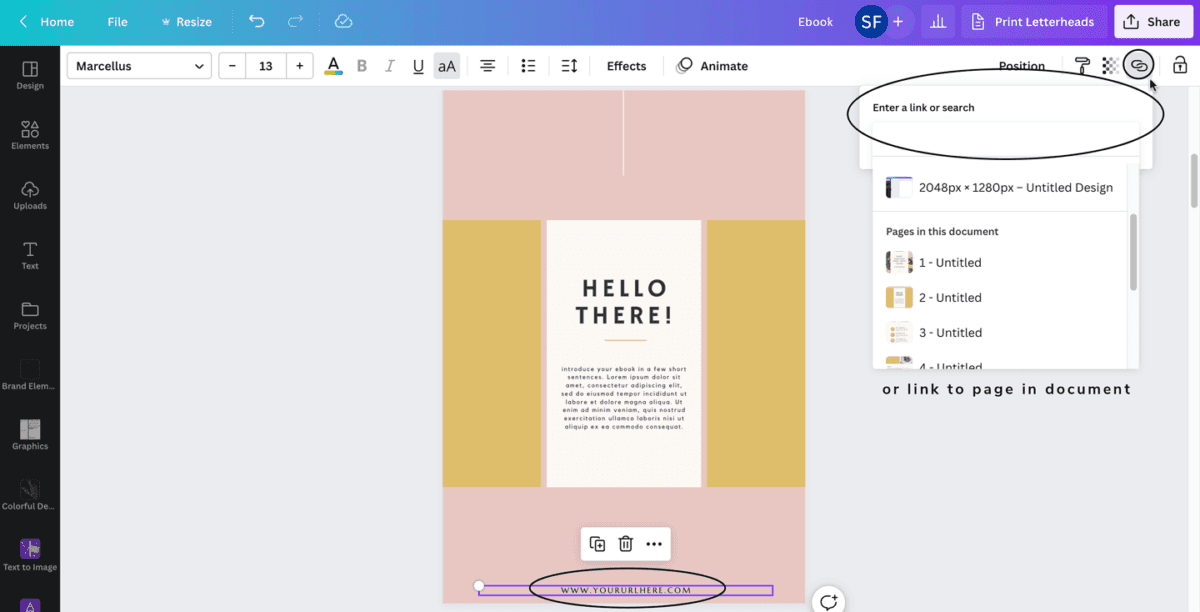
Here’s how to add hyperlinks to your design:
- Select the object you want to use as the hyperlink
- Then, click the three vertical dots in the Top panel
- Select the Link icon (you can also access the link feature by right-clicking on the object)
- Enter the link address or select the page you want to link to
- Then, click Done
14. Publish Websites Through Canva
Canva allows you to publish your own fully responsive website through their platform for free. You can also connect your own domain or purchase one through Canva; however, you need the Canva Pro Version.
The Canva Website feature is a great way to publish a one-page website, like landing pages, coming soon pages, and bio link websites.
In addition, Canva lets you personalize your website with navigation menus, font styles, colors, and images.
If you’re publishing a domain through the free Canva site domain, you can have five domains as a free user and unlimited domains with Canva Pro. However, you can publish only five of your own domains.
Follow these steps to access Canva Websites:
- Head to your homepage
- Then, click Websites in the What Will You Design Today box
- Choose a template and start designing
15. Use Shortcuts to Speed up Your Design Process
When creating a design, use Canva keyboard shortcuts to help you speed up your workflow.
Honestly, besides the basics—copy, paste, delete, undo—I’ve never quite mastered keyboard shortcuts.
I must be a sucker for punishment, I guess.
Nonetheless, I’ve been experimenting with Canva shortcuts, and I’m amazed at how much faster I finish my designs.
Here are some useful shortcuts:
- Ctrl/Cmd + C: Copy
- Ctrl/Cmd + X: Cut
- Ctrl/Cmd + V: Paste
- Ctrl/Cmd + Z: Undo
- Ctrl/Cmd + D: Duplicate
- Ctrl/Cmd + A: Select All
- Ctrl/Cmd + F: Find and Replace Text
- T: Add Text
- R: Add a Rectangle
- L: Add Line
- C: Add Circle
- /: Magic Write
- Option + Ctrl/Cmd + C: Copy Text Style
- Option + Ctrl/Cmd + V: Paste Text Style
- Ctrl/Cmd + ]: Arrange Elements Forward
- Ctrl/Cmd + [: Arrange Elements Backward
- Ctrl/Cmd + K: Add Link
- Ctrl/Cmd + G: Group Elements
- Ctrl/Cmd + Forward Slash (/): Toggle Sidebar
- Option + Ctrl/Cmd + 2: Thumbnail View
- Option + Ctrl/Cmd + 3: Grid View
- Ctrl/Cmd + Click Mouse: Select Layered Images
And for more shortcuts, click the question mark icon at the bottom left of your design window and search for Keyboard shortcuts.
16. Use Magic Write to Generate Written Content
Do you struggle with writer’s block? Well, the Magic Write tool can help you get your creative juices flowing.
Magic Write is a new feature in Canva that uses AI technology to generate sentences and paragraphs in seconds.
Depending on whom you ask, AI for content creation is either innovative or a big no-no. Although I agree there are cons to using AI tools, from plagiarism to inaccurate information, I think there are safe ways to use them.
With that being said, use Magic Write to help you with your content creation, from blog posts and social media captions to business plans and newsletters.
So tell it what to write, and the Magic Write tool will generate copy for you, up to 500 words per prompt.
Here are a few prompts to try:
- Brainstorm ideas for a food blog post
- Create headlines on gardening tips for beginners
- Write social media captions for a new digital product
- Draft an introduction for a blog post about money-saving tips
I enjoy using AI tools to brainstorm ideas, write social media captions, and craft headlines. I never use the generated copy word for word; instead, I use it as a stepping stone to craft my content.
Also if you have the free version of Canva, you’re limited to 25 lifetime Magic Write uses. However, Canva Pro users have 75 Magic Write uses per billing cycle.
Here’s how to access the Magic Write tool:
- Go to your homepage and select Doc
- Then, click to open Doc (located under Start Writing)
- Click the plus mark and select the Magic Write option
- Finally, describe what you want Magic Write to generate and hit enter
Bonus Canva Tip: Remember to fact-check the content and tweak the copy to make it your own
17. Organize Your Canva Account to Stay on Top of Your Projects
If you’re familiar with Canva, you know how messy your Canva account can get. Sometimes we organize our business but neglect some areas, like our Canva account. One Canva hack that has served me well was finally getting my account decluttered and organized.
Create a Folder Structure
The first tip in organizing your Canva account is to create a folder structure.
Think about the areas of your business and the type of projects you design. For example, if you’re a blogger, you may create folders for lead magnets, graphics, blog images, and Pinterest pins.
Name Your Designs
The second tip is to name your designs based on your folder structure. For instance, if you create graphics for a blog and podcast, add the name of the blog or podcast in your project title.
Search any word from the title, and Canva will auto-generate the related projects.
Bonus Canva Tip: Name your projects before you work on your design
Follow these steps to access your folders:
- Go to your homepage
- Go to the Editor Side Panel and click Projects
- Then, click Add New to add folders
- Drag-and-drop or bulk-select your designs
- Finally, select the Folder icon to move them into a folder or the Trash Can icon to delete
Add Tags to Images
The last tip is to use Canva tags to add additional keywords to help locate your projects. Currently, you can only add tags to images and videos.
For example, if you have an image saved as Garden Planner, use words like freebie, garden, mockup, and the business name as tags to make it easier to find your file.
Bonus Tip: You can’t add spaces in between multi-word tags, so you’ll need to group them into one word
Here’s how to add tags to your images:
- Hover over your image file
- Click the three vertical dots
- Then, click add Tags
- Type your keywords
Canva Tips for Pro Features
The free version of Canva offers plenty of features to bring your design visions alive, but sometimes you need more tools to level up your projects.
In fact, Canva Pro unlocks premium photos, elements, and videos and offers additional features not found in the free version.
18. Use the Magic Resize Tool to Resize Your Designs
The Magic Resize tool helps you quickly create different sizes of your design. For example, you can easily resize your Pinterest pin into an Instagram graphic.
I especially enjoy using this tool to create different versions of my printables, which I then offer to my audience.
Here’s how to use the Magic Resize tool:
- Click on the Resize button at the top of your design
- Select a preset design size or enter your custom dimensions
- Then, click Resize to change the current size of your design or
- Select Copy and Resize to create a resized version in a new window
19. Set Up Your Brand Kit to Keep Your Designs Consistent
Without a doubt, the Brand Kit is by far one of my favorite Canva Pro features. Gone are the days of spending hours searching for a logo or image on my computer to add to my designs. Now I can have all business-related assets in one place.
The Brand Kit allows you to maintain consistent branding with customized color palettes, font styles, and logos. Then with one click, you can add them to your projects. In addition, Canva allows you to have 100 Brand Kits with the Canva Pro version.
You can use the Brand kit in the free Canva version, but you have no access to set your fonts or add logos, and you can only add three colors to the color palette.
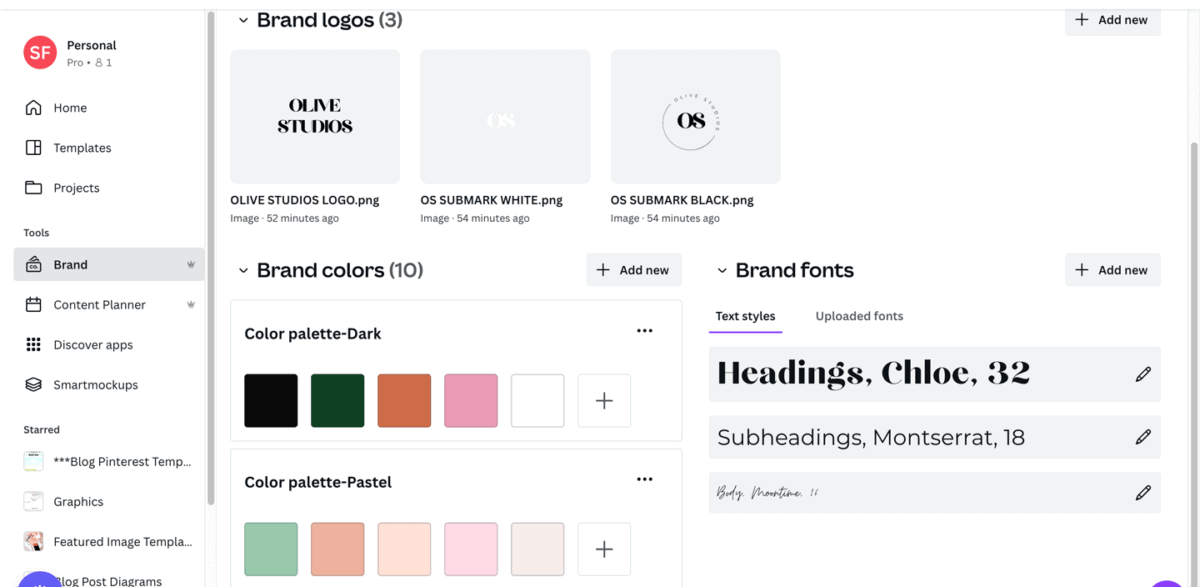
Follow these steps to access your Brand Kit:
- Go to your Canva homepage
- Then, click Brand in the side panel
- From the Brand Kit tab, click Add New
- Add fonts, colors, and logo elements
Bonus Canva Tips:
- Create multiple versions of your logo and a variation of your color palette to use on different media
- Add frequently used headshots or profile pictures under logos for easy access
Here’s how to use your brand elements within your designs:
- Go to the Editor Side panel
- Then, click the Logos tab to find logos and any other brand images
- Select the Text tab to use your brand fonts
- Then, click the Color Tile on the top panel to use brand colors
20. Remove Image and Video Backgrounds
The Background Remover tool removes the background of your images and videos.
Furthermore, it’s a must-have feature if you want to create headshots without the busy backgrounds, and Canva makes it simple with one click.
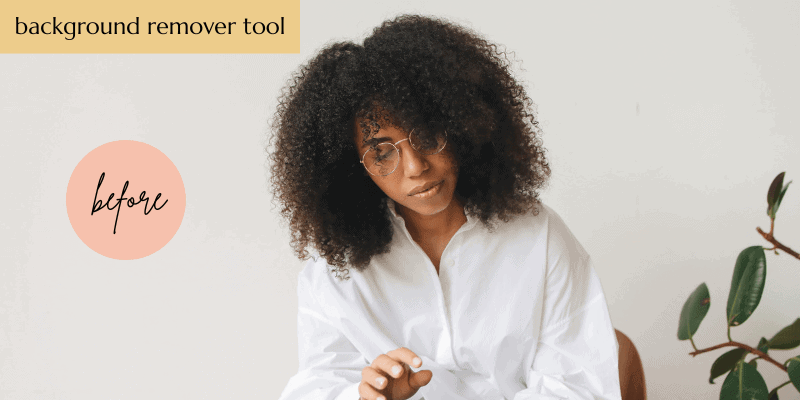

Here’s how to use the Background Remover tool:
- Select your image or video, then click Edit Image in the top panel
- Click Background Remover (BG Remover)
- Then, clean up your image with the Erase or Restore brush
- Click Apply, then Done
Last Thoughts on Canva Tips
Whether you’re an experienced Canva designer or just getting started, I hope these tips can help you master Canva and level up your designs.
What Canva feature are you looking forward to using? Let me know in the comments.
Related Canva Articles
Best Canva Hacks
Did you find this post helpful? Pin it for later!
