
Blogging Workflow: How to Create a System That Will Ease Your Workload



Create a Blogging Workflow to Streamline Your Tasks
Whether you’re a newbie or a seasoned blogger, you’re familiar with the various tasks needed to publish a blog post and run your business.
It’s easy to become overwhelmed and burned out by your never-ending to-do list, but there’s a solution to help you stay productive and far away from blogging burnout.
The answer is blogging workflows.
In this post, I will share how to create a blogging workflow, what you should include in your systems, and how to organize your workflows.
Let’s jump right in.
THIS POST CONTAINS AFFILIATE LINKS, WHICH MEANS I MAY RECEIVE A COMMISSION FOR PURCHASES MADE THROUGH MY LINKS AT NO EXTRA COST TO YOU.
Why a Blog Workflow is Important
A Blog Workflow Helps You Weed out Redundant Task
A workflow, a series of tasks needed to complete a project, helps you streamline your blogging and business tasks. I like to picture my workflows as a series of checkpoints I need to clear before I can move on to the next one.
For example, performing keyword research before you outline a blog post or creating an outline before you write.
When I was winging my blogging tasks, I discovered I was repeating my tasks.
For example, my blog posts were not clear and required substantial rewriting. However, when I added outlines to my blogging workflow, I improved my writing and spent less time editing.
Repeating a task or constantly checking if you’ve done something only slows your progress.
However, using a workflow to remind you of your tasks can save you time and reduce mistakes.
Blogging Workflows Improve Your Efficiency
I’m all for working smarter, not harder.
Don’t you agree?
I quit blogging after a short time because I was too overwhelmed.
When I finally returned to blogging, I knew I wanted to succeed, but I also wanted to keep my sanity.
I implemented a few changes, and workflows and systems were one of them.
Blogging without a workflow opens doors for errors, wasted time, and stress.
However, a workflow gives a clear overview of your projects, which helps you prioritize your work, eliminate procrastination, and batch your tasks.
Adding a blogging workflow to your business will enable you to focus on areas of your business you deem most important or provide the highest return on investment.
For example, a workflow can help you recognize whether you spend too much time planning your Instagram content and not enough on your SEO strategy.
Blogging Workflow Helps You Identify Areas for Automation
Manually processing your tasks takes time and energy, and it certainly sounds like working hard, not smart.
Amiright?
A workflow should organize and simplify your blog business. Automating the items within your workflows further streamline your tasks and saves you more time.
A blog workflow will help you recognize areas of your business you can automate. Create your workflows, then review each task to determine if you should automate them.
For instance, you can use a social media scheduling tool to schedule and post your Pinterest pins and social media content. You can also schedule your blog post and emails ahead of time.
Now, you may not need to automate every task, and you shouldn’t drive yourself crazy trying. With time, you’ll recognize which tasks you should automate and which ones you should do manually.
Blog Workflows Make it Easier to Outsource
During your business journey, you may decide to hire help.
Now imagine if you run your blog with no workflow, only on sheer memory. How can you teach your new hire the ropes and trust they’ll perform well?
You have a business to run, and you’re not using your time wisely if you need to guide your new hire each time they perform their job duties. Sending them a document they can refer to makes much more sense.
That’s where a blogging workflow comes in handy. A workflow helps you delegate tasks and keep team members on track.
The Research Stage of Your Blogging Workflow
The research stage is the first step in creating your blogging workflow. The research stage is one of the most crucial phases of your blogging workflow because it helps set the groundwork for your content creation.
When you write a blog post without researching the topic, keywords, or competition, you could be wasting your time writing a post you can never rank for, or something people are not even searching for.

Perform Keyword Research
The first step in your research phase is to perform keyword research.
Keyword research is the process of identifying popular words and phrases your target audience type into search engines and determining whether you can rank for them.
There’s so much that goes into keyword research. And what I talk about here barely scratches the surface. But one thing I want to point out is keyword research is the link between your business and your target audience and a determining factor for ranking for the keyword.
Keyword research will help you determine the difficulty of ranking for the keyword, scope out your competition, check the search intent, and check search volume trends.
You can use a keyword tool like Keysearch to find relevant keywords, check backlinks, and analyze competitors’ data. However, I listed some free keyword research tools below.
Bonus: Use code KSDISC for 20% OFF
Around 90% of blog posts get no traffic, and one reason is users are not searching for the topic. There must be a demand for your keyword, and it also needs to be relevant to your audience.
Here are a few elements to include in your keyword research:
1. Keyword Difficulty
Keyword difficulty is a Search Engine Optimization (SEO) metric that determines how easy or hard it is to rank for a keyword.
Keyword difficulty tools, like Moz, take into account Domain Authority (DA), Page Authority (PA), and estimated click-through rate (CTR).
You can use the free MozBar Chrome Extension to check DA and link authority.
The higher the score, the more difficult it will be to rank for it. However, a low score doesn’t always mean the keyword is viable. There are other factors you should consider before you write a blog post.
2. Search volume trends
Search volume trend shows how popular a keyword is over a certain period. Use a free tool like Google Trends to check the popularity of a search term.
For example, if you create seasonal content, checking the trend of your keywords can ensure you plan and publish your content at the right time.
Let’s look at the term fall vegetables in Google Trends.

There is little interest in the search term from January through May. But it picks up some popularity around June and continues to climb, reaching its peak interest at the end of September. However, the trend dips by the end of October.
It makes little sense to publish fall-related garden content from January through May. And since you need to give your post time to rank, posting in September or October is too late. So the best time to publish fall garden content is in June or July.
The bottom line is that you should post content 2-3 months before it trends, and checking the search volume trends will help you choose the best time to post.
3. Search intent
Search intent (or user intent) is the why behind the user’s search query.
Types of Search Intent:
- Informational: the user is looking for information or has questions
- Transactional: the user is looking to make a purchase
- Navigational: the user is looking for a specific website
- Commercial: the user is looking for a product or service

Once you have a keyword in mind, plug it into Google search and analyze the type of content on the 1st page of Google.
If you’re writing a blog post on a topic, but the results are mostly videos, the chances of you ranking for the keyword in a blog post will be more difficult.
Let’s look at the keyword garden tools. According to page 1 of Google, users want to buy garden tools, not read about the topic.
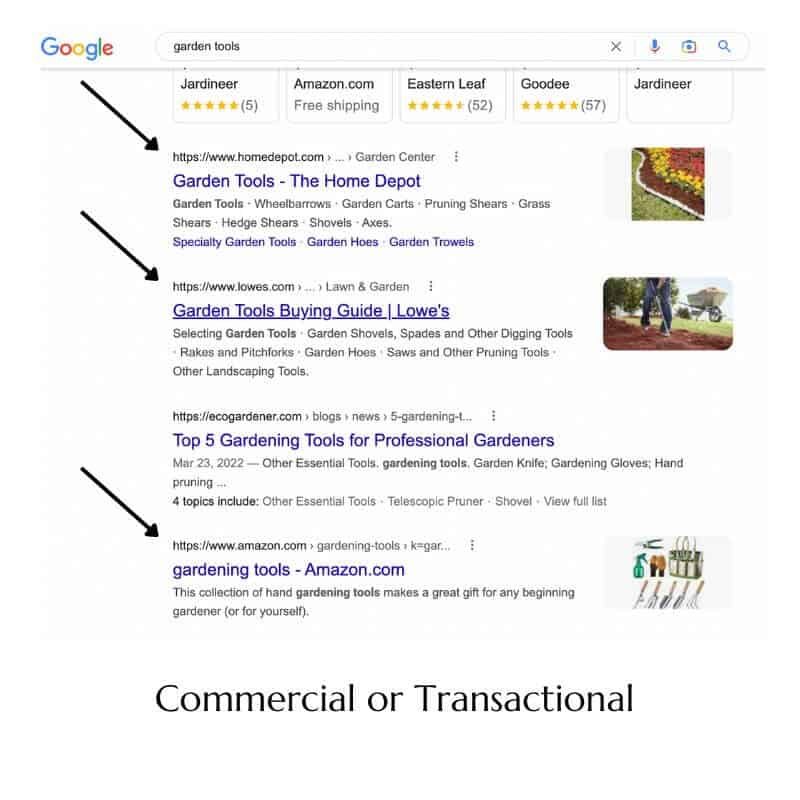
Now let’s look at the term organic fertilizer. As you can see, users are more interested in getting information on the topic, not making a purchase.

If you write a post on the Best Organic Fertilizers for a Vegetable Garden, you have a better chance of ranking for this keyword.
The goal is to match the structure of the content you find on Google’s first-page search results.
4. Competitor Keyword Research
You also want to check out your competition before you commit to a keyword.
Competitor keyword research is the process of finding and analyzing the keywords your competitors are targeting.
Now checking your competitors’ sites doesn’t mean copying or one-upping each other.
This post explains it best.
The goal is to find and fix content gaps and check for holes in your SEO strategy.
Use tools like SEOquake to check competitors’ DA, PA, and the number of backlinks. You can also click on their website to analyze the quality of their post. Did they answer the audience’s questions? Are they following on-page SEO best practices?
If not, you may have the potential to write a post that will perform better.
5. Find additional keyword variations
When you perform keyword research, you want to have several keyword variations to use in your article.
The last thing you want is to use the same keyword throughout your blog posts. Users use various search queries, so if you use one keyword phrase, you could lose out on potential traffic from the other keyword phrases.
Besides, focusing on one keyword makes for a poor user experience, and Google is smart enough to tell when you overuse a term or use it out of context.
For instance, let’s look at the keyword, summer vegetable garden.
Your keyword variations could be:
- Vegetables to plant in summer
- Summer planting
- Plants to grow in summer
Come up with at least 3-5 additional phrases and sprinkle them naturally throughout your article. Using keyword variations will help you rank for other search terms and potentially drive more traffic to your blog post.
Outline Your Blog Post
The next step in the research phase of your blogging workflow is to outline your blog post. You have the choice to list the outline process in your research or writing phase.
I include my outline workflow in my research phase because I add all the information I find during my keyword research to my outline. So it makes sense for me to include it here.
Here are a few key elements to include in your outline:
1. Post title and title variations
Brainstorm your title (H1 header) and several variations for Pinterest pin titles.
Remember, your blog post title is the first thing users see after they perform a search. Create a title that grabs the user’s attention and prompts them to click to see more.
Google cuts off your title in the Search Engine Results Pages (SERPS) at around 60 characters.
So place your keywords toward the beginning of the title and keep the length between 60-70 characters.
Use a tool like CoSchedule Headline Analyzer to help you whip up powerful titles.
The headline analyzer rates your headlines, identifies the common, uncommon, power, and emotional words, and shows where to improve.
While the CoSchedule Headline Analyzer is a helpful tool, it’s not the be-all-end-all, and sometimes you’ll have to use your judgment.
2. Headers and subheaders
Your headers are the main points, and the subheaders are the supporting points of your article. These would be the H2-H6 headers.
Your headers show search engines the importance of your content. H1 (Post Title) is the most important, then your H2, H3, and so on.
Headings are a way to organize and structure your content, so you should use them in a hierarchical structure. You’d never want to start your article with an H3 header or jump from an H2 to an H4 header.
Tips on creating headers:
- Like your title, you want to craft eye-catching headers and subheaders that keep your reader engaged
- Use headers to break up your text and make your content easier to scan
- Use your keywords and keyword variations naturally in your headers
3. Internal and External Links
You want to make sure your blog post includes internal and external links. So when you create your workflow for your outline, add a section to list your links.
Google uses a bot called Googlebot to crawl your links and index the pages on your website. Pages with strong links indicate possible high-value content and signal Google to pay attention to it.
Internal links are links that connect two pages on the same website. Linking a related post to your current posts provides your readers with additional information on a topic and keeps them on your website longer.
The posts you link to should relate to the current article. Also, you want to add internal links within and at the end of your blog post.
External links are links that connect a page to a different domain. External links help your readers understand a topic further and alert Google that you may have a high-quality post.
When you link to another source or article, you want to link to high authority links because they’ve established trust with search engines. You also want to be sure the link is relevant to your content.
The Writing Stage of Your Blogging Workflow
Draft Your Blog Post
Once you’ve completed your outline, the next step in your blog workflow is writing the post.
And the actual writing part should be less daunting if you started with an outline. Simply go through each section and fill in with supporting information.
The outline is a step in your blogging workflow you can’t afford to skip or slack on. Trust me; it simplifies the writing process.
However, if you operate better without an outline, by all means, skip it.
You can write the post the way you like. Start with the introduction or write each section as the ideas come to you.
Tips for writing a blog post:
- Write with no distractions
- Set a timer
- Try not to make corrections or do further research while writing
- Turn off spell check and grammar so you can focus on writing
- When an idea comes to you, use a placeholder and come back later
Edit Your Blog Post
Now it’s time to tidy up the post.
Here are a few items to add to your editing workflow:
1. Check clarity and readability
It’s easy to deviate from the point as you write, so reread your post and add, rewrite, move, or delete information for clarity.
- Check and remove filler and redundant words
- Check for grammar and spelling errors
- Read your post aloud slowly to catch incorrect word usage, punctuation, and spelling errors
- Use tools like Grammarly to help you fine-tune your posts
2. Check your format
Readers like to skim content, so they’re likely to ignore a wall of text.
Aim to have a maximum of three sentences in a paragraph (and you can use one-sentence paragraphs for emphasis).
- Double-check if you’re using headers and bullets to break up your text
- Use italics and bold text to emphasize a point
- Also, check if you have enough keyword and keyword variations in your article and add them as needed
The Design Workflow for Your Blog Post
The next step in your blogging workflow is the designing phase.
Now this will look different for everyone. For example, a personal finance blogger can use stock photos, but a food blogger may have to take their own photographs.
Make a list of graphics you need for your blog posts, including social media graphics and Pinterest pins.
I love Canva and use it to design all my graphics.
Here are a few tasks to add to your design workflow:
- Take photos or choose stock images
- Take screenshots or design other supporting graphics
- Choose featured image
- Design pin and write pin description
- Create content upgrades
- Design social media graphics and write captions
- Write an email newsletter to notify your subscribers about the new post
Pro tips:
- Add keywords in the image filename and alt text for more SEO juice
- Use tools like TinyPNG to resize images
The Publishing Phase of Your Blogging Workflow
I like to call this the putting-it-together workflow.
At this point, you have all the pieces of the puzzle, you’re just fitting everything together.
You don’t have to break down your blogging workflow as I did. You can just as easily combine the publishing and promotion phases into one.
Because the tasks are strikingly different, I prefer to keep them separate.
The first step is to add your blog post to WordPress or the blogging platform of your choice.
Then add your images to your post (e.g., featured image, supporting graphics, Pinterest pin, content upgrade, and an opt-in freebie) and fill out alt texts and pin descriptions.
The next step is to add your keyword phrase, complete the meta description, and adjust your permalink.
Pro tip:
- Remove filler words and irrelevant numbers from your permalink (e.g., a, the, and numbers in list posts)
- Preview your post on desktop and mobile versions to check for usability
The Promotion Phase of Your Blogging Workflow
Getting your blog post ready for publishing is only half of the work. The second half is the promotion of your article.
As I mentioned, if a combined publishing and promotion blogging workflow works best for you, then you don’t have to create a separate section for your promotion phase.
So much goes into publishing a blog post, so I try to take care of the nitty-gritty tasks before I publish the post. For instance, I want to avoid writing pin descriptions and newsletters on the day of publication.
My promotion workflow is simply uploading, scheduling, and publishing my posts.
Here’s my promotion blogging workflow:
- Build links (internal links and backlinks)
- Submit URL to Google Search Console and Bing Webmaster Tools
- Upload or schedule pin on Pinterest
- Share blog posts on social media channels (Instagram, Facebook, and Twitter)
- Send newsletter
Maintenance Phase of Your Blog Workflow
Content creation makes up only a portion of your blog business, but you also have to take care of the maintenance side of your blog.
Here are a few tasks to include in your maintenance blogging workflow:
- Check analytics (Pinterest and Google)
- Log income and expenses
- Back up website
- Update plugins
- Organize files
- Check and respond to emails
- Update old blog posts
- Take a blogging course
You have control over how or when you complete these tasks. However, you will discover that it’s better to complete some tasks daily or weekly and others every few months.
Setting up Your Blogging Workflow
Audit Your Current Blog Workflow
Review your current blogging workflow, jot down each step, and adjust as needed.
If you’re a beginner blogger trying to set up a workflow, it may be tough to understand what’s needed. After you write a few posts, come back and modify your workflows.
Organize Your Workflow Sequence
Are you wondering how to put your workflow together?
Now, how you create your blogging workflow comes down to preference. You can use spreadsheets, project management software, or printable templates.
I’ve added my workflow to Project management tools, like ClickUp, and I’ve also used a checklist I created in Google Docs. Try out a few different methods and see what suits you best.
Last thoughts on Blogging Workflows
And there you have it.
No matter where you are on your blogging journey, a blogging workflow can help you streamline your tasks. But once you have a structured and well-designed workflow, your blog will become much simpler to manage.
Related Blogging Articles
Blog Workflows for Content Creation
Pin for later.
